— Thursday, 7 August 2014 —

G&G King Size Brown lenses on light eyes


G&G King Size Circle Brown

Diameter: 14.5mm
Water Content: 38%
Base Curve: 8.6mm / 8.8mm
Life Span: 1 year disposal
Usually costs $25.90, but got it as a gift when buying another pair of lenses from honeycolor. At the moment they are out of stock for these lenses so you can get them at pinkyparadise.


Me without the lenses
Comfort:
These lenses are 0.00-0.00  perscription, so I can not wear them every day as I don't see. That's making it hard to judge the comfort level when I cannot wear them reguraly like my other ones, but what I can say is that the lenses are a bit too big for my eyes and they do sting a bit after wearing them for an hour.

Room lighting
Enlargement: 
These lenses are perfect for achieving the big eyed dolly look as they are 14.5 mm in diameter and that is quite big considering our natural diameter is only 13.8 mm!

Natural daylight
Design:
I always expected these lenses to be more on the dolly side, but I think if a girl with brown eyes wore these, she could get away with them looking quite natural, but on my light eyes it's painfully obvious that I'm wearing lenses. The black limbal ring is a bit too thick in my opinion, if the design improved and the company would leave a smaller hole for the pupil I would consider buying them in the future.

With flash
 
Short summary of the lenses:
Not for everyday wear, but great for cosplays and photoshoots as your eyes would suffocate from their size. My blue eyes are very visible in day light so there's no way they look natural. The lenses only look believable in room lighting as seen above.

— Tuesday, 27 May 2014 —

Hair Styling: Making my dreams come true


When I first started this blog, I wanted to share my passion for hair so that perhaps one day I would be able inspire you and you would be able to inspire me. I think, so far, we've been able to achieve that, at least on a small level anyway, because we have so much more stories to share and an even longer journey to go. In respect of that, I'm going to share my own story of why I wanted to become a hair stylist since I don't think I've posted about that yet and I hope to hear your own stories too.

"A woman who cuts her hair is about to change her life" - Coco Chanel

It's true. Cutting your hair will change your life. In my case, that moment came when I cut the hair of my own barbie. Yes, a barbie; a platinum silk-haired barbie doll from the US that my parents bought me for Christmas. Her hair was soft like it was made of natural wool; flexible and colour absorbent too unlike the fine plastic strands of today's dolls. I was only 6 years old at the time but taking care of that doll's hair, experimenting with it and making it look pretty made me dream of dedicating my life to hair. That one barbie was my inspiration. It was my way into colouring hair constantly and braiding it in all kinds of ways like the french braid and fishtail — up to this day I still love it.

All these years of being fascinated by hair led me to the decision that I want to train as a professional hair stylist, which I will become one day. Originally I planned to study at Femina Bona Wellness Institute back home in Lithuania because their courses were much more affordable compared to London schools, but sad news reached me from a previous graduate who informed me that the Pivot Point diploma is not accepted in the UK. Even if they promised worldwide recognition. Now that girl has to start all over again here in London, many pounds poorer. Although, I really have to thank her for reaching out to me and being honest.


It was a blessing in disguise as I could have spent eight months studying back home only to find out that no salon here can accept me upon graduation. It means I'll have to tighten my belt to save up so I can to begin the pricier courses at The London Hair Academy, but at least I'll have my first step in the professional hairdressing industry. Short term pain for long term gain. It will be worth it!

Apparently, this is one of the best private academies in London when it comes to fast track NVQ courses and, as much as I'd prefer not to rush my training, it's a great way to begin my career in hair styling. I will try to record and share my progress as much as possible here on my blog so you can keep updated on how I get on and if the course is worth the price they are asking for. I certainly hope so because I moved on from styling barbie dolls a long, long time ago! Now's the time to put my ideas into practice, just like all the greats before us.

— Monday, 12 May 2014 —

DIY: Easier way to dip dye hair extensions

So basically the technique I'll be using today is going to be very, very simple and the damage to the hair is going to be minimal. I'll be using light colored hair extensions and going to dye them a darker color on the top to avoid damage. Also this way it's actually easier to achieve the perfect ombre look.

You are going to need:

- 18" Clip in extensions (T6/27) from cliphair.co.uk 
- CLAIROL semi-permanent medium ash brown hair dye
- A shopping bag of some kind (when I say DIY I mean DIY) 

Step 1) Lay out 2-4 hair pieces of the extensions at a time on a plastic bag covered table. You do not want to lay out more than 4 extension pieces as the time difference after you dye them is going to be too much and they might come out in different colors.


Step 2) Dye the extensions to the point where you want the dark color to finish, remember to dye it from both sides!


Step 3) Depending on the intensity of color you are trying to achieve wait between 10 to 30 minutes before washing out the dye, make sure to keep an eye on the extensions because they tend to absorb hair dye more quickly than our own hair. I waited 10 minutes for each hair piece.

And this is the result!


Oh and I'm also wearing a clip in fringe! Looks so real right?

— Wednesday, 7 May 2014 —

How to achieve Valentino's bubble ponytail


YAY for easy catwalk hair!

Today's hairstyle is going to be one that we saw on the Valentino catwalk: the bubble ponytail.

You are going to need:

- 24" Hair extensions (I don't have long hair)
- 1 strong black elastic band and 6-7 transparent rubber elastic bands
- A tail comb
- Water
- Strong hold hairspray

  
Step 1) If you are using hair extensions like I am, first you need to attach them to the back of your head without cliping in any on the sides because they would show up when you would need to tie the hair. (Right picture above for reference)


Step 2)
Spray some water on your hair this way it's easier to slick it back nicely with a black elastic (mine has a bow hehe), once the hair is in place use some hairspray to keep stray hairs in bay, if you have hairs at the front falling out like me just spray some more hairspray and use clips to keep the hairs in place until the hairspray dries.


 Step 3) Take the small rubber elastics and tie them along your ponytail at about one pinky finger in distance each, after every hairband you put in start shaping the bubble with a tail comb or nails by pulling the hair, once you are satisfied with the bubble ponytail use some hairspray so the bubbles don't fall out!


                                                                       DONE!

— Thursday, 24 April 2014 —

Getting violet eyes with Geo Tri Colour Violet (on blue eyes)

We all have guilty pleasures! Even some we're not quite proud of like, ahem, salt and vinegar crisps, but once in a while is alright, right? And I'm guessing everybody knows that I'm a big circle lenses enthusiast so, of course, like a huge circle lenses addict, I get a new pair and post about it!

Unfortunately I wasn't able to post about a great pair of violet lenses I had in the past because, well, this blog didn't exist and my writing probably sucked like hell anyway. I even tried to order them again from Pinky Paradise but the lenses were discontinued! Gutted! Instead they recommended the Geo Tri Color series as they're the most natural looking ones with minimal enlargement. Perfect really, this time I didn't want to look like I'm on hallucinogenics or some alien hybrid.

The lenses looked quite promising in the bottles:

Here, I'll be completely honest with you, initially I was disappointed that they weren't as bright as my old ones, but after a couple of times of wearing them I got used to the idea that they were much more natural to look at. After all these are completely different lenses and they deserve a fair review.

Natural
Flash
Daylight

Enlargement: 10/10
I'm going to give these a score of 10 just because they were perfect for what I was looking for, albeit I wasn't really looking for much enlargement anyway, but they certainly did the job! What's probably more telling is that I feel confident to leave the house without any makeup with these lenses.

Comfort: 6/10
Comfort wise these lenses could be better — I'm not sure why but even if I soaked the lenses in solution overnight before wearing them, I would still feel a slight sting in my eyes. It's not bad enough for me to take them out but it's still uncomfortable. Although on a positive note they don't move out of place, something I had experienced with one of my previous lenses before.


Design: 8/10

First of all I have to say that these lenses are cute and subtle but I've got a tiny issue with them: it's the yellow color towards the pupil. For this reason I don't think the lenses can reach their full potential as violet contacts, well it might work for dark eyed girls but it does nothing for those with light eyes. The gold tones are swallowed by my natural blue color leaving little effect in blending it or making the lenses stand out, which for me is the whole reason of trying new circle lenses! Perhaps if it was a lighter shade of violet, it would make the eyes pop out more with the natural eye color less visible.


Overall: 8/10
I really do like these lenses even with the slight discomfort in wearing them, which I don't mind as I don't wear them for long periods of time anyway. I think they could look playful (not even sure if that makes sense!) especially on days when I work in the children's section at my workplace. I'd just need to pair these lenses with long wavy hair and a cute kitty hairband so I'm ready to entertain the children that come in... with a cute cartoon character look.

Check out these cute circle lenses at Pinky Paradise if you want to have natural looking violet eyes!


— Tuesday, 22 April 2014 —

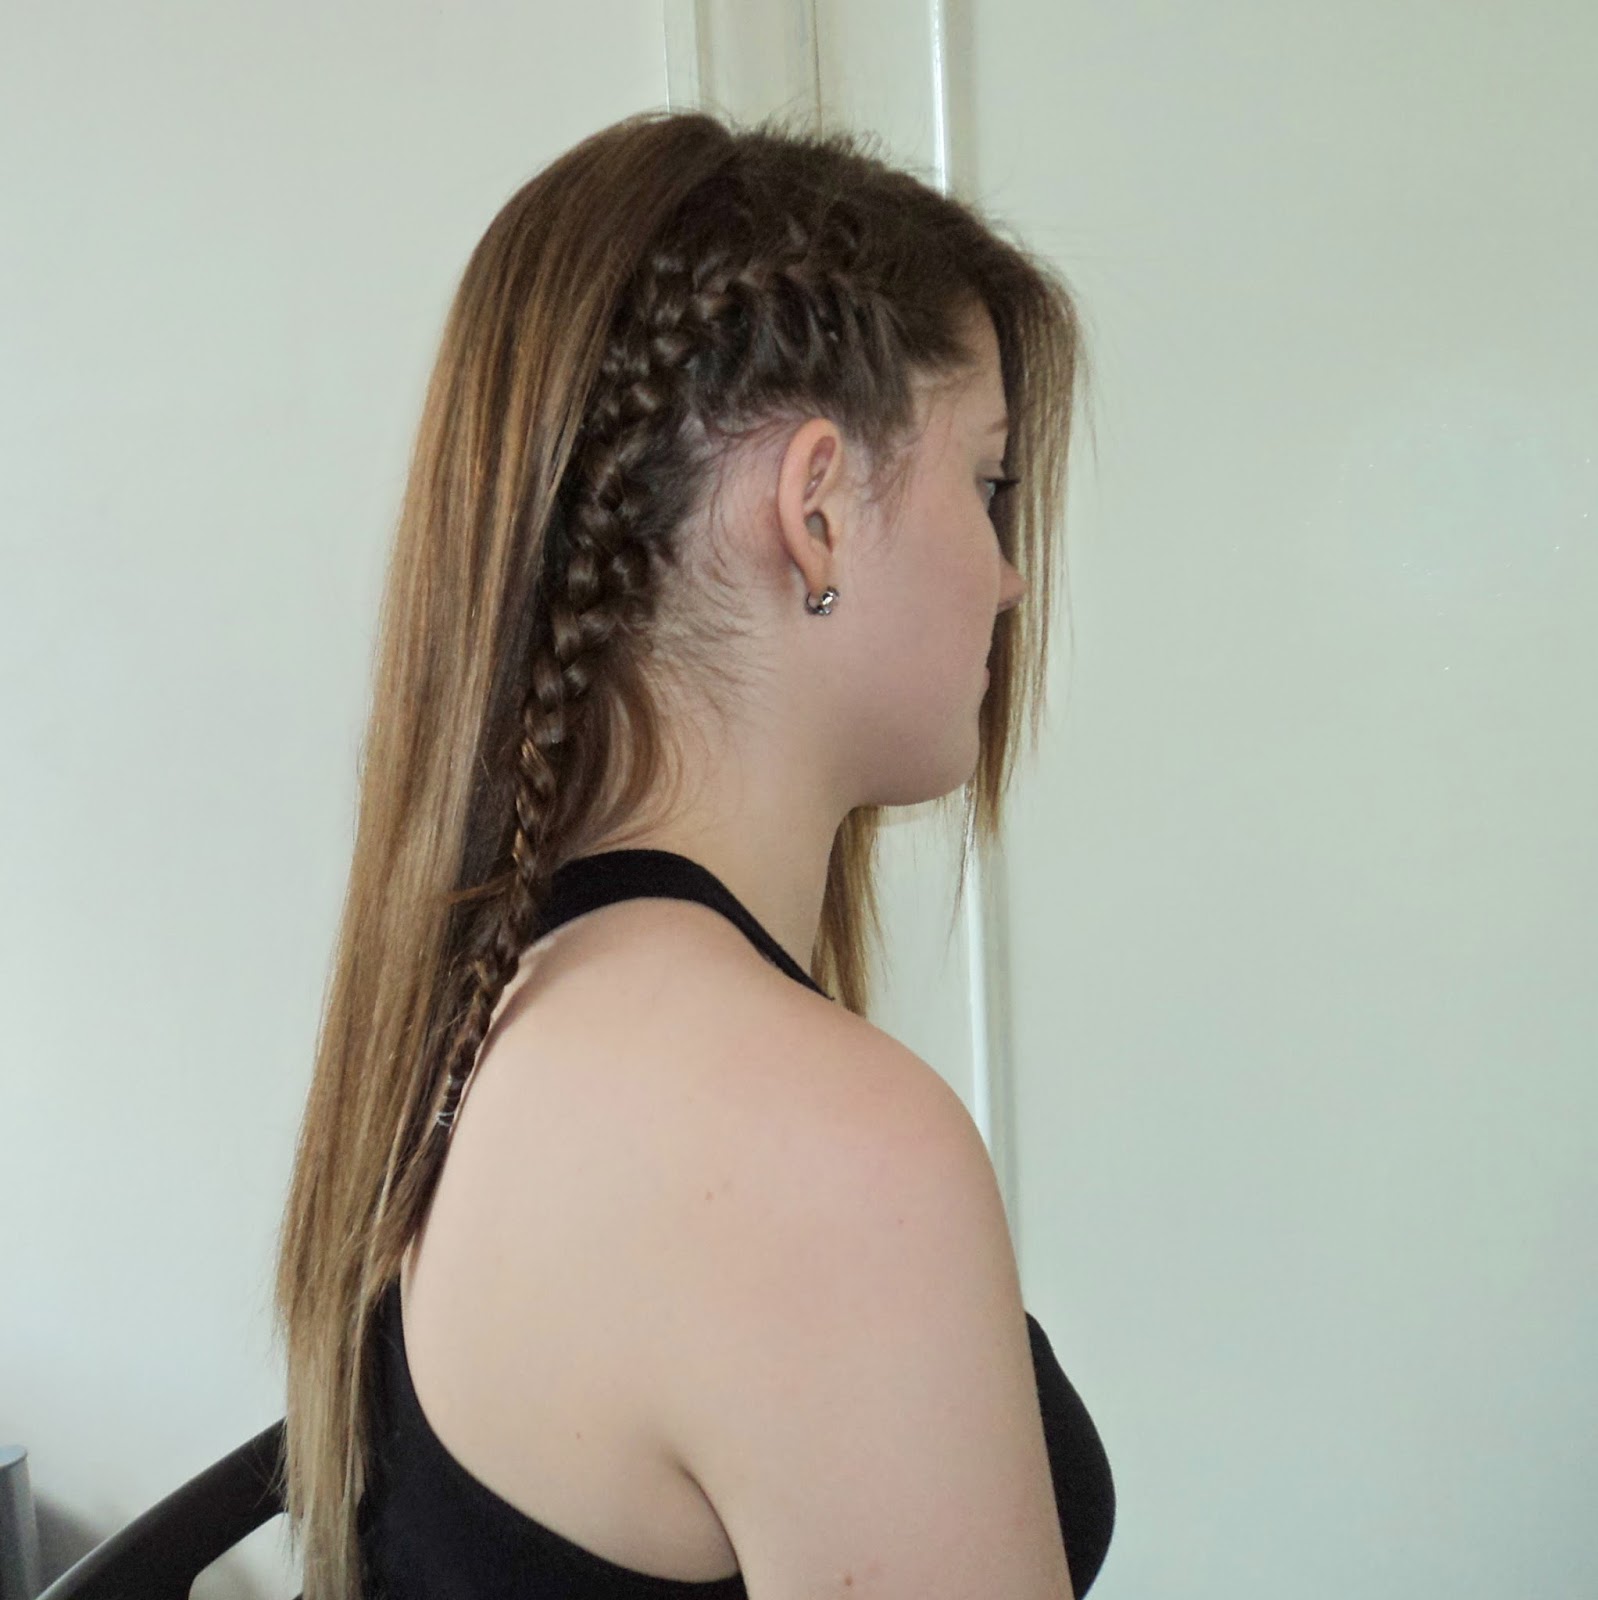
Cara Delevingne insipired faux mohawk with dip dyed hair


If you're a regular follower of the Daily Mail, you probably read about Cara Delevingne every 20 minutes — whether she's rocking on the catwalk or showing off her butt cheeks on the beach with Michelle Rodridguez. To be honest she looks just like the kind of girl I would love to be a hairstylist for (or at least hang out with!) as she's not afraid to show her quirky side in public, only to prove how human she is. And not just another supermodel!

As everyone's favourite IT girl, with her natural tomboy look, I'll try to re-create her side-braid punk look from the Met Ball Red Carpet 2013 because she totally stole the show there. It would probably be more likely categorized as a faux mohawk but these dip dyed extensions, which I wrote about earlier in the month, provide a punkier edge for anyone wanting to steal their own show!

All you will need is:
1. A tail comb
2. A transparent elastic band
3. Hairspray
4. Dip dyed hair or hair extensions

Step 1)   Using a tail comb, create a clean, deep side parting on your preferred side (I chose my right side). Then, create a vertical sectioning from the top part of the back of the head (where the side-part ends) down to the nape of the neck, about half way between the center of the head and the back of the ear (so if your parting is on the right, you should now have a section that takes up about a third of the hair on the right hand side).

Step 2)
   Pin back the bigger section of hair to keep it out of the way while we braid the smaller section of hair.


Step 3)   To create the braid on the smaller section of hair start by using your fingers or tail comb (whichever you prefer) to divide the hair into three small strands at the hairline. Cross the top strand over the middle strand, then the bottom strand over the first strand (just how you would braid a regular french braid) and repeat this action adding more hair into the braid until you reach the the very end of your neck and then just plait a regular braid until the very ends. In case the braid is a bit uneven or stray hair are sticking out spray some hairspray to even out.


Step 4)   For the unbraided section of hair, first you should put in your hair extensions up to the middle of your head (First I tease the roots with my tail comb then clip in the extensions) Depending on what you prefer, once the extensions are in, you can either tousle the hair, straighten it or curl it, I will just leave it completely straight, this way it still stays a bit casual.

Accompany this look with a strong brow and red lipstick and you are ready to go! Suitable for parties and even for casual daily wear.


— Tuesday, 15 April 2014 —

Getting the Sunkissed Look With Dip Dyed Hair Extensions

 From my trusted and favourite provider www.cliphair.co.uk 
18" double wefted dip dyed extensions in the colour T6/27.

How many of us wanted to dip dye our hair but would be afraid of damaging it from bleaching? It happened to me before and I really didn't want to take that risk again so I decided to give dip dyed extensions a go instead— it can't hurt right? I ended up trying Cliphair's Dip Dyed Extensions T6/27 who I already had a good experience with buying hair pieces from and reviewed one of their products not long ago. It's cheaper than dying hair at the hairdressers and keeps my natural hair healthy.

The first thing I want to mention is that Cliphair's customer service is fast, personal, and quite frankly, brilliant compared to other hair extension websites that I've tried in the past. The staff I've talked to are always helpful, either on their Facebook page (failed to ask the persons name) or when dealing directly by email (Thanks Riz!). This time the company were nice enough to send me two colour samples of the dip dyed extensions before I made a decision so I could see which colour would blend best with my natural hair, reassuring me that there will be no problem to exchange them for something else if they are too light. In the end I kept the extensions and wish a big thanks to the person that was helping me. I would've got them a big box of Raffaello's if I didn't eat them first! And for me, that's saying something.


In the end I decided to get the lighter extensions because my own hair is a medium golden brown and it's best to have three shades in dip dyed hair; creating that perfect, natural-looking 3 color gradient— just like a young girl's hair that got bleached by the sun over the passing years and failed to trim them out. I'd like to think that's where the dip dyed hair technique originated from but let me know if that's a fact because it would be interesting to find out!

The hair extensions are of a real great quality, perhaps better than my previous ones, because I didn't even need to touch it with a straightener when taking the pictures. Although sometimes I'd need to readjust the clips since they can slip out over the course of the day, but it could've been a problem with the batch they received. Despite that, the hair was silky, soft and pin straight! I swear it would pass the straw test for silkiness (putting a straw in the extensions to see if it falls to the ground) but they pass an even more important test...one where I can't stop touching them.


If anyone is worried about the effects of dip dying your hair then I'd recommend getting some dip dyed extensions as an alternative. Let me know what you think of the results of my own hair and I'm happy to answer any questions about buying hair extensions from the Cliphair website. Just drop me an email or a comment below!